* This post contains affiliate links. For more information, please read my affiliate disclosure. *
Our most recent project was a garage “deep clean” and reorganization. It took us most of January to get our garage to its current state and there are still some small projects that we want to complete. I did come across some tips I thought would be helpful to you. If you are getting ready for this type of projects, they might just spark an idea for your garage.
Here are my Top 7 Tips for a Clean and Organized Garage.

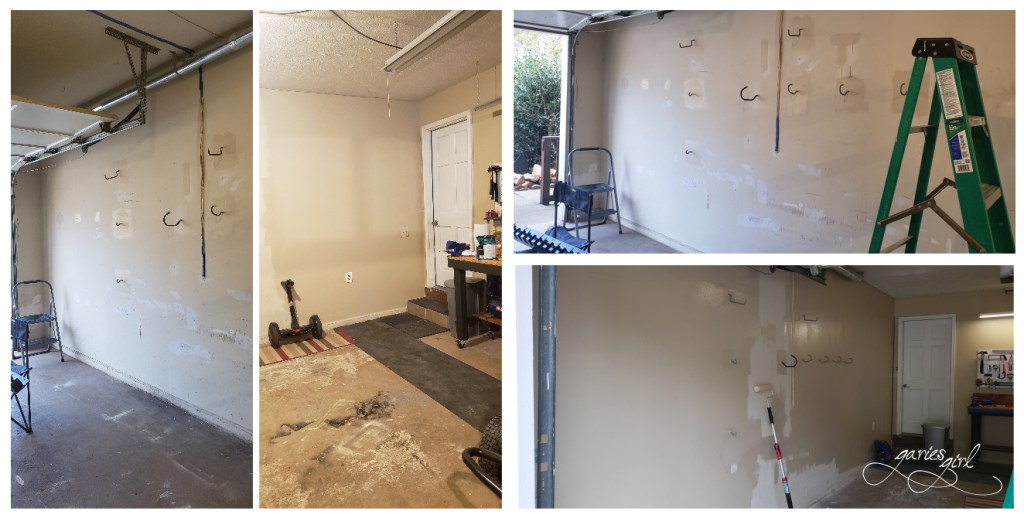
1) Paint the Walls
As it does for the inside of a house, paint goes a loooooong way to provide a clean and fresh look in the garage. We spent a lot of time prepping the walls by filling holes and scratches with drywall mud and sanding those down again. Our walls were previously painted and all it took was 1 gallon of paint to give it a fresh new look. I love the look of a freshly painted space and don’t mind the effort of getting it to that point. If you are a return reader, you will remember how paint transformed our dining room!
When it comes to paint, a garage should be treated the same as any other room in your house. Although, if your garage is not climate controlled, be sure to use Exterior Paint.
I used a paintbrush and roller to complete this project, but to cut down on time spent on the ladder, I used an extension pole. This extension pole is probably my favorite paint tool!
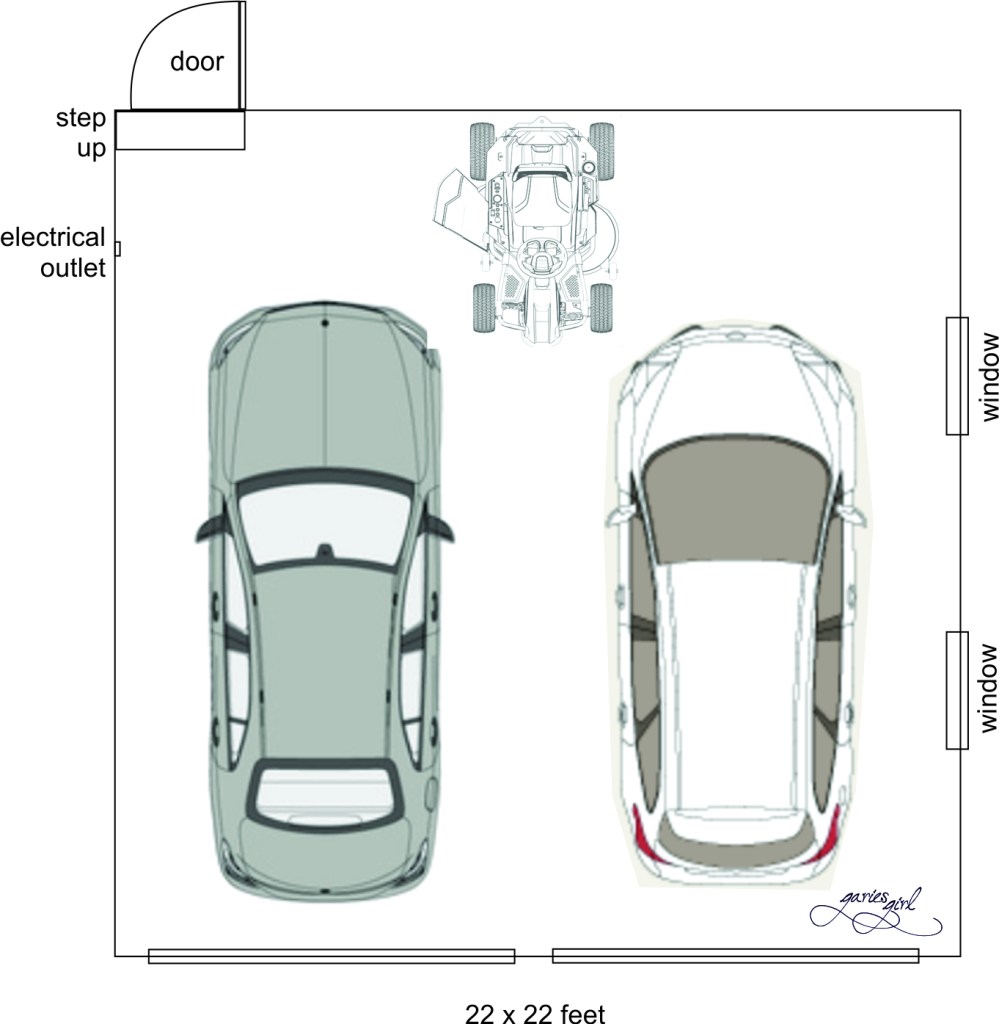
2) Create a Floorplan
Not all garages are the same. You might have a single garage with an extra storage nook, or like us, a two car garage that was slightly longer than the space needed for two regular sized vehicles. I say this, because Pieter’s truck can technically fit in the garage, but only if the front almost touch the wall. And then you can’t really walk around or behind it – there is absolutely no room left when that monster is in the garage.
A floorplan is important. You might have all the wall space you can use on the side, with the depth for a shelving unit there. Or, as in our case, a riding mower that needed to go in a specific spot to allow cars to still park in the garage.
Start with pen and paper and draw a rough floorplan of your garage. Mark the location of your doors, windows and things like electrical outlets. If you want to add items like workbenches, it would be more logical to be close to an outlet. For shelves, maybe a more “out of the way” spot in the garage will work better. If you want to take this a step further, add in the measurements of your space. It is easier to decide what you want to build / store / fit where on paper than it is to do it with the actual items. Trust me on this!
Here is my floorplan showing our vehicles and where they need to park:
3) Invest in Good Sturdy Shelves or Build your Own
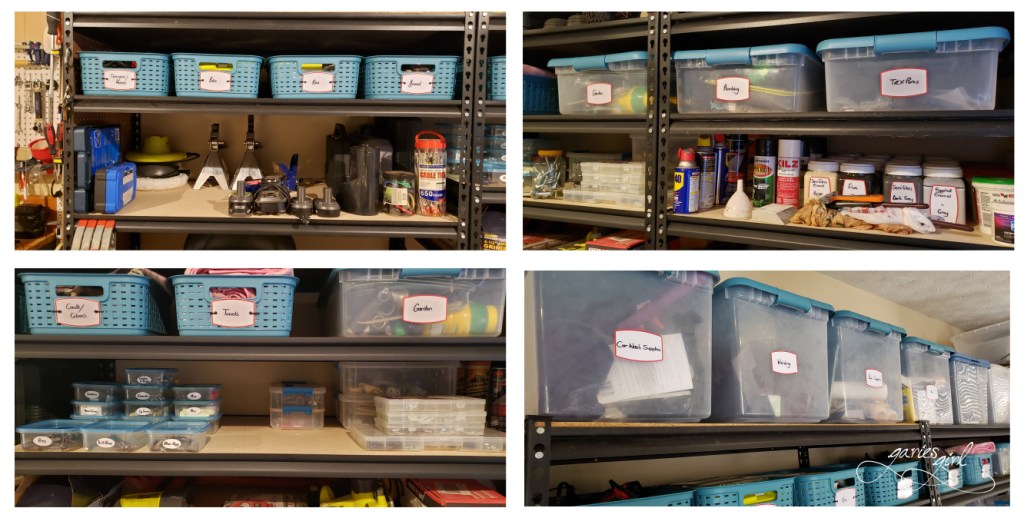
While I was planning on building our own shelving unit originally, I was able to change direction when my dad suggested using what we had instead and just adding on to it. We ended up with three shelving units on the back wall of the garage and still had enough room for the riding mower, power washer and other items that were on wheels and could be rolled out when needed.
Also spend time planning what will go where on your shelves. This will help you decide how high individual shelves need to be. In our garage, I created one narrow shelf for shallow bins and baskets. Full size bins would go on the top shelf, but since we were only doing a single row of these, I can reach them without the use of a ladder (and having to move other bins out of the way first). This is a huge deal for me, since I’m what you would call “vertically challenged”. Officially the shortest person in my house now for at least the last 4 years, if not longer.
We went with three of these units. Building them was straight forward and we could decide where to place the shelves according to the height of the items we wanted to store. Make sure to fasten them together and also to the wall, for additional stability.

4) Categorize and Group Garage Items
I did a major garage cleanup in January 2020, so there wasn’t a lot of junk or trash anymore. But I still had a lot of stuff on my shelves. I took a long hard look at what was left and moved some items down into the basement. They were just not used that often to justify taking up valuable space in the garage. I organized and grouped the items that were left. I had two types of garden tools (tall and short), electrical cords, garden hoses, some sports equipment, fishing rods, chairs and some hobby items. By seeing everything in groups, it was easier to find a specific place for everything on a shelf or on the wall.
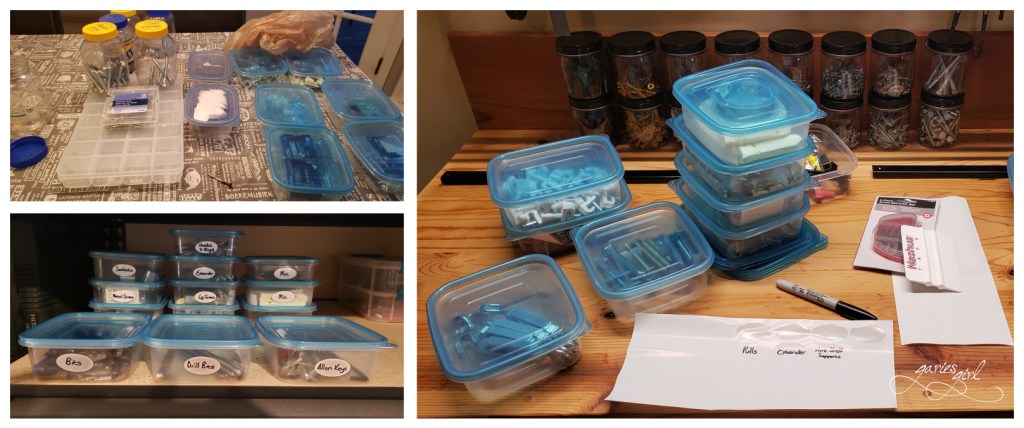
This is not limited to the larger items. Sort and group your small items too! I went through all our screws, nuts, bolts, etc and created dedicated storage spots for each type. Our screws are now organized in these plastic containers. At 8 oz big they are the perfect size and come with a metal lid, that will allow them to fit onto a metal tool strip.
5) Put up a Pegboard for Tools
I absolutely love pegboards. I even had a whole pegboard wall in my previous laundry room. Remember this room from our Rome, GA days? Pegboards are perfect for storing tools. Not only are all your tools visible, but the empty spot where something should be hanging is a reminder that a tool is not in its place.
We added three pegboards to our garage. One above our new workbench on the wall, one vertically on the side of our shelving unit, and the third on the wall between two windows. While this one doesn’t technically hold any tools, it still holds items we use from time to time, like edge trimmer line and packaging tape.
You are not restricted to using the hooks for pegboards either. We fixed three of our magnetic tool holders to our pegboard with nuts and bolts and now have a perfect spot for screwdrivers and some other oddly shaped tools. Really spend time on organizing your pegboard and don’t be afraid to change it when it doesn’t work – you will not be sorry!

6) Utilize Plastic Storage Bins
This is my go-to storage item. I prefer the see-through kind, but any type will work. The trick is to again try and be as uniform as possible. Decide how many of each size you need, pick a consistent theme (I went with blue lids and bins) and start filling those bins up. Do not forget to add a label. You would think with them being see-through all family members can easily find what they are looking for. Without labels, I was still asked where things were. Now that the labels are on all the bins, they can find what they are looking for without my help.
We use three types of bins in our garage. I would recommend these bins in a heartbeat.
7) Utilize Vertical Wall Space
Instead of expensive wall track systems (and there are a lot of different ones available out there) I went with a mixture of items. A heavy-duty organizer bar for tall garden tools such as rakes and spades, two steel hook and rail systems, each with 4 (or 8, depending on what you hang) hooks for the shorter garden items (think snips and shears) and individual metal hooks, the kind that screws into wall studs. Following my floorplan from earlier, I was able to create storage where I needed access to specific items.
We used a lot of these hooks and were able to store longer items by placing two hooks slightly apart (see pic below).

8) Bonus – Put Items Away
This is my bonus tip. Now that you have put in all the hard work to get your garage clean and organized, it is easier than ever to put items away. You can easily see where everything has to go and you would want to put them away to keep your garage clean and organized. After each project, take the extra 5 minutes to do this and you will be a happy garage owner for a long time to come!
Do you have extra tips that you want to share? Let me know 🙂 If you want to read about our garage project up to this point, start with part 1.

Happy Organizing!
