* This post contains affiliate links. For more information, please read my affiliate disclosure. *
Do you ever sit and look at a problem area of your house and get hit by one of those lightbulb moments? In this case, that was exactly what happened. And no, I cannot take credit for the idea this time… Pieter came up with the idea, planned it all out, and installed it all by himself. I mostly just watched this time around.
A Cover for Your Deck
This quick little project wasn’t really on our running To-Do list. We had an umbrella on the deck that we would open over our table when we had people over, and kept closed when not in use. This means it was rarely open lately – COVID-19 and staying home and all of that… But it meant the deck was always in the sun. Well, mostly, since we do have some nice tall trees that provided shade in the morning and the house itself provided shade on the deck in the afternoon… In our case, adding an overhead cover was all about making it feel cosier and yes, adding some shade if we really wanted to be out on the deck during the middle of the day.

A Bit of Back Story
Now, why did we look at deck shade options to begin with? It started with a Facebook post. We joined our neighborhood’s Facebook page after moving in, and it has been a great way to connect with neighbors, know what was going on in the neighborhood, and get (and give away) free household items. We recently re-stained our deck railing, sealed the deck itself, gave our outdoor table a makeover, and updated our outdoor lighting during our COVID-19 stay-at-home and keeping busy period. Here is a link to that post in case you missed it: Staying Home – The Conclusion.
We looked at the shade situation at that time and played around with the idea of adding our gazebo (which has been in storage since we moved in 4 years ago) to the deck. The problem was the limited available space and the breakfast nook bump-out that would make the gazebo a less-than-ideal solution. In the end, we decided to keep our existing umbrella and just replace it in the Fall when prices for outdoor furniture are lower.
Then, one Sunday, I saw a post on the neighborhood Facebook page for a free 10 x 10 gazebo. I immediately replied that we would take it. This is a smaller gazebo and would fit the space perfectly, or so I thought. I’m not sure how I got it wrong, because normally I can visualize things and know from the start not only if something would fit, but if it even would work in an area. I rounded up the whole family the next Saturday morning to go take the gazebo down and reinstall it on our deck. The cover was in worse shape than it looked in pictures, but we persevered and brought it home. You can always order a new cover online.
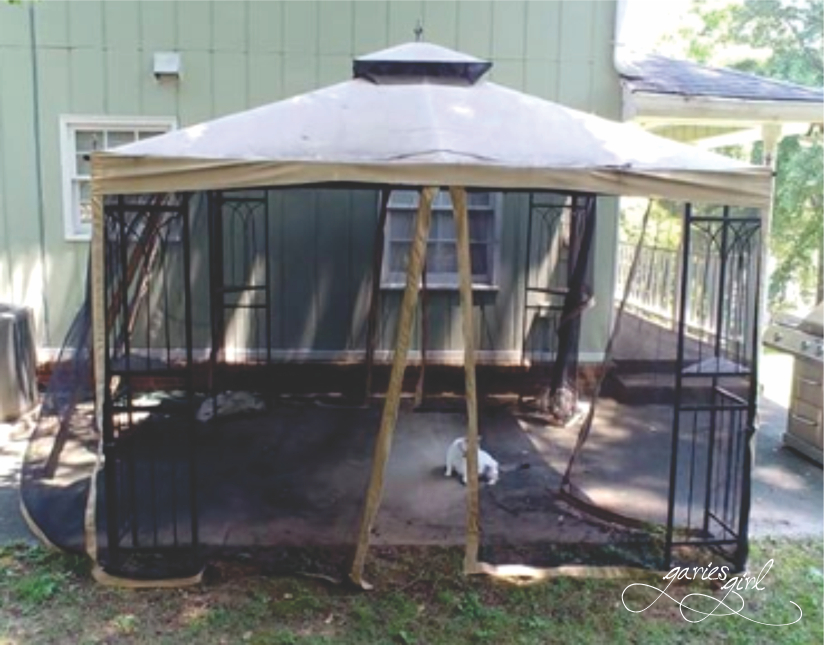
Once we got everything home, the project started to go wrong. The gazebo had wide corners with shelf inserts. I never took into account that this type of corner post will not work on our deck. The gazebo was big enough to cover our table, but then no one would be able to get to the table since the corners would be in the way. We tried it on the other side of the deck, and here it blocked either the door from the kitchen or the entrance to the deck. It was just not going to work.
I got so upset with myself at this point. Not only did we just take down and remove a neighbor’s gazebo for free, but we also weren’t even able to use it, and it had to be stored along with our other items that were “junk”. My family was all worked up, sweaty and full of bug bites (I really scheduled this task far too early in the morning for teenager moods). And we had nothing to show for it.
An Idea was Born
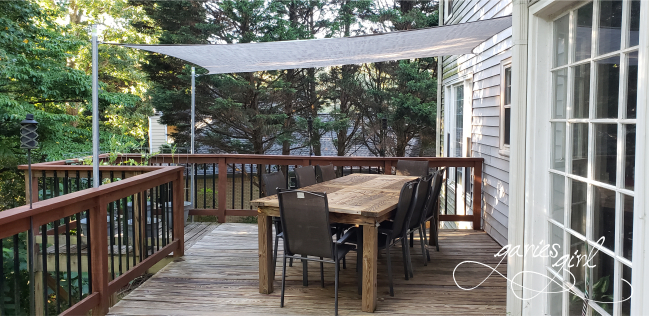
All of this got Pieter to rethink the possibilities of adding shade and cover to our deck. With the way our deck was constructed, adding a permanent roof wasn’t an option. The best we could come up with was to add retractable awnings, the automated kind, but this was on the pricey side and would go on a “nice to have someday” list. And that made Pieter think of Shade Sails. This was his lightbulb moment!!! A lightweight (and extremely budget-friendly) option that would work great for our space.
We took measurements and settled on a grey 10 x 12 sail and ordered it on Amazon right away. While we waited for the package to arrive, we popped into Home Depot and shopped for the rest of the supplies. We needed two upright supports and some hardware to complete this project. Wooden uprights were quickly ruled out because of weight, and we picked some 8-foot line posts as our supports. These are galvanized but can be painted.
Our Supply List
- 1x 10 x 12-foot Shade Sail from Amazon
- 2x 8-foot Line Posts
- 2x Eyebolts
- 2x Screw Eyes
- 4x Carabiners (also called Spring Links)
- 4x Long Screws
Installation
Pieter started by installing the 2x eyebolts directly into the side of the house (into studs, of course). The shade sail comes with pre-installed metal rings, one on each corner, so he hooked a carabiner in each and attached that to the wall eyebolts. The sail was now attached to the house, and we were able to mark the exact placement of our two line posts.
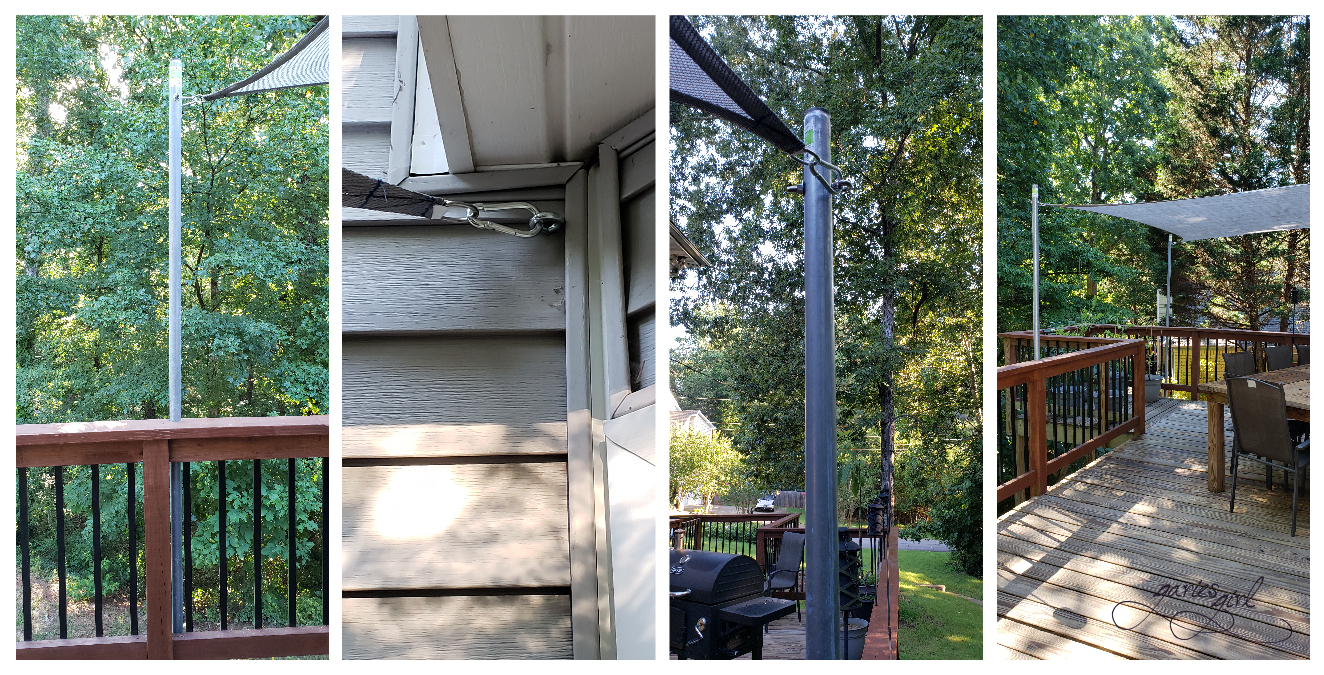
To fix the posts to the deck, we drilled holes directly into our railing top plates. This would allow the post to fit through the top plate and sit right on the outside of the railing. We used smaller pieces of two-by-fours to act as a spacer between the deck and the bottom of the post. The spacers were fixed to the deck first, and then the posts were fitted through the holes and fixed to the spacers using long screws. This part of the project included pre-drilling holes in both the spacers and the posts, as well as countersinking holes in the spacers. That way, the bolts used to fix the spacer to the deck did not protrude and get in the way of the post screws.
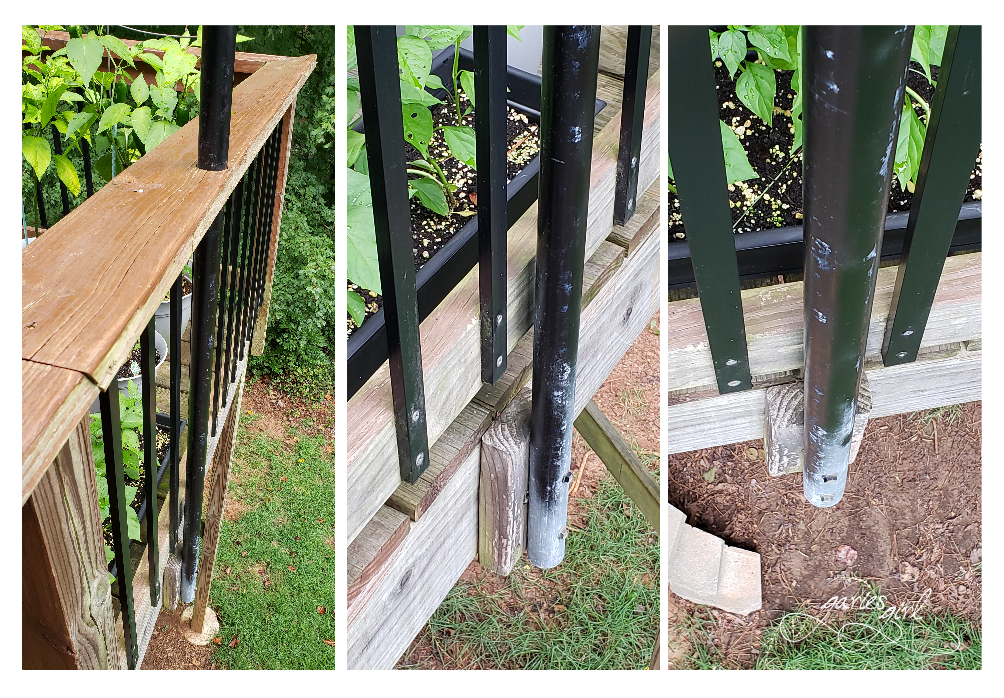
The top of the posts got some screw eyes, allowing us to hook the final two carabiners to the poles.
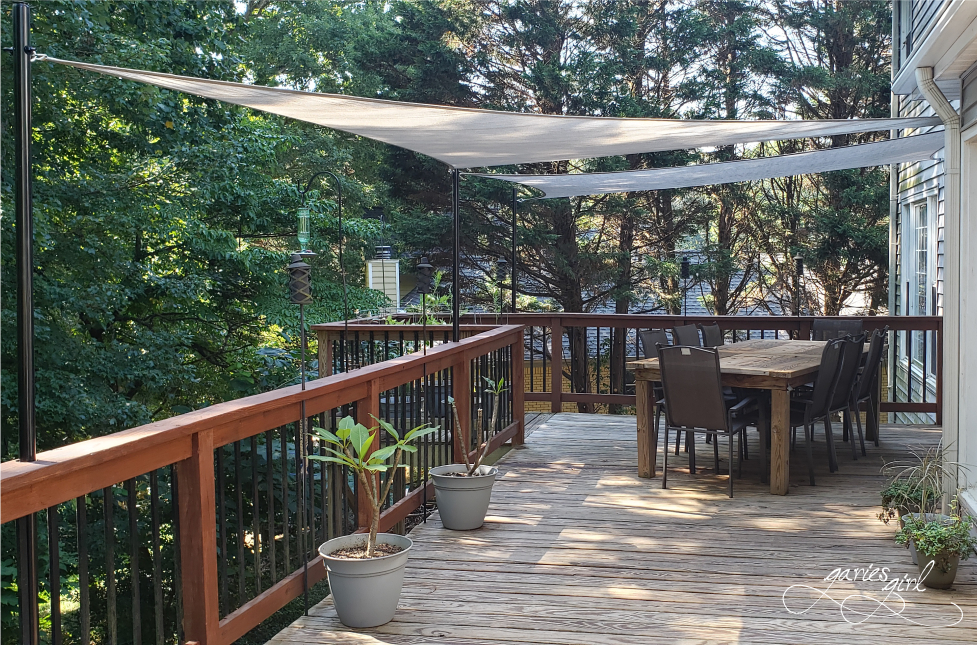
The Reveal
From start to finish, this installation took less than 3 hours! Most of that time was spent on marking our holes on both the posts and the deck, predrilling them and confirming our measurements throughout the process.
In fact, this was such an easy project that we bought a second sail from Amazon that same evening. The second sail was triangular in shape. We made another trip to Home Depot for a third pole, two carabiners and one screw eye (for the new pole). The new sail was attached to one of the existing anchor points on the house, one of the existing poles and the newly installed third pole.
All that was left at this point was to paint the poles black, sit back, and relax under our new shade sails!

What do you think of this project?

This is the route we need to take to install one. Do you have any photos of how the galvanized posts are attached on the outside of the deck?
LikeLike
Hi Ciara, thank you for reminding me! I updated the blog post with three new photos of how the poles are attached to the deck. I always meant to go back and paint the bottom section of the poles, but it is still on my “to do” list 🙂
LikeLike