* This post contains affiliate links. For more information, please read my affiliate disclosure. *
My sister-in-law gave us two bookcases when they moved into their new house. They came in very handy for storing our books in our guest bedroom in Rome, GA and later, in the basement of our new house in Suwanee. I had to move them upstairs when we needed elbow room for our new (to us) pool table. The only logical spot for them (and their contents) was in my office.
Now… these bookcases were not pretty to begin with. Think wood look laminate… Think brown. And think basic. But they were still sturdy and had a purpose – house my small collection of Afrikaans and English books, some of which we moved here from South Africa.

So when they started to call my office their new home, I knew that they would have to change to “fit in better”. I decided that I would paint them white and maybe do something fun to the back of them. They went on my project list which is where they stayed until three weeks ago. It was finally time to work on them!
I did some research and decided that a good primer and paint might save me time and effort on the dreaded sanding step. I was right and in the end, I didn’t sand them at all (!).
Paint Supplies
- 1x Can of Kilz Original Interior/Exterior Oil-Base Primer
- 1x Can Behr Interior/Exterior Oil-Base Semi-Gloss Enamel Paint
- 1x Plastic Drop Cloth (9′ x 12′)
- 1x Two Pack Mini Foam Rollers (4′)
- 1x Mini Tray and Roller Kit
- 1x Sanding Block
- 1x 10 Pack Latex Disposable Gloves

The Prep Work
I actually unpacked these bookcases when I had the interior of our house painted a couple of months ago. When the painting project wrapped up, I just moved both bookcases to their original spots and never bothered to unpack my collections again. The bookcases were just standing there empty, begging to become pretty for the last two months (!). All I had to do to prep them for this project, was to move them away from the wall again, remove the shelves, dust them off a bit and place the plastic drop cloth underneath them. Oh, and I also had to move the bed (with the sleeping cat on it) out of the way.

The Makeover Process
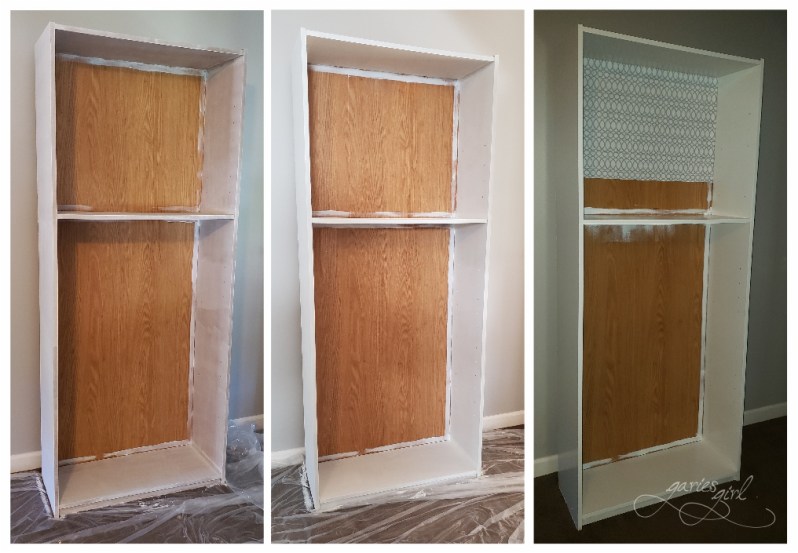
I applied my first coat of primer on Saturday and the second coat on Sunday. I used my roller on all the flat surfaces and a small paintbrush for the corners and the edges. Since I decided to apply contact paper to the back of the bookcase (which I didn’t even bother to remove), I didn’t worry too much about getting paint on those areas.
Once the second coat of primer was dry I unwrapped my sanding block and started the sanding process. After sanding a small section on the side, I realized that I really could not see much of a difference at all. I also had very little sanding dust. Right then and there I decided to skip the sanding step altogether. Happy times!
Next up – the topcoat. I planned on doing only one coat, but since the paint dried so quickly, I just went ahead and did a second coat too. The second coat took longer to dry, but I wasn’t that pressed for time and the bookcases could stand empty for as long as I wanted them to.
I actually moved the shelves down to the garage and painted them there. I had just enough primer left for one light coat per shelf, so I primed the top of each shelf. I then did two topcoats on the underside and two topcoats on the top.
I worked on the back of my bookcases while I waited on the shelves to dry. I spotted some rolls of adhesive paper in the Clearance Section at BigLots and I really like the pattern. The size wasn’t perfect, but I thought I could make it work. I ended up applying them in multiple horizontal strips, including overlaps to get the pattern to line up. I would cut a piece a bit wider than the bookcase, reposition it so that the pattern line up and then tape it into place with painters tape. I would remove one side of the backing paper, smooth that side down, and then do the other side. It took 5x horizontal strips per bookcase.
By the way, have you seen the selection of Amazon peel and stick wallpaper? This would have worked just as nicely for this project. Do yourself a favor and check out the different patterns available online.
Back to the Bookcases… Once the shelves were dry enough to move, I carried them back upstairs to my office and placed them in the bookcases. I painted the front of each shelf in place and left the whole thing to dry some more.

Finishing Touches
In the end, I lived with the finished but empty bookcases for two more weeks. It just worked out that way where I was too busy to unpack my boxes of books and knickknacks and by the time I got around to it, it was two weeks later. I see this as a bonus since it gave the paint a proper chance to dry.
I added all my books (grouped by language and author), along with some more storage boxes, candles, picture frames and some miscellaneous fun pieces. Not all my books made it back into the bookcases though. I liked an “emptier” look and picked my absolute favourites. The rest of the books went into a donate box and into my car. I’m sure they will find a new home soon.
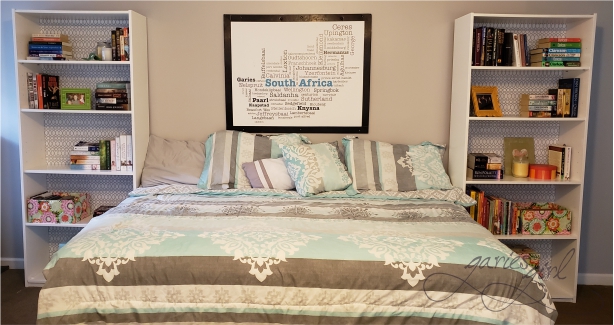
So there you have it. My bookcase project is complete and I’m extremely happy with the outcome.
What have you painted lately and were you happy with the outcome?
Read more about how I Painted Wooden Blinds!

4 thoughts