* This post contains affiliate links. For more information, please read my affiliate disclosure. *
Next on my refresh list for our Rome Fixer Upper, was the bedroom hallway, hall closet, and the guest/kids bathroom.
My plan was to spend as little money as possible here since we had a full bathroom remodel on our future to-do list. For now, I wanted to cover or hide the awful ugly in these areas, and make it more bearable for my family!
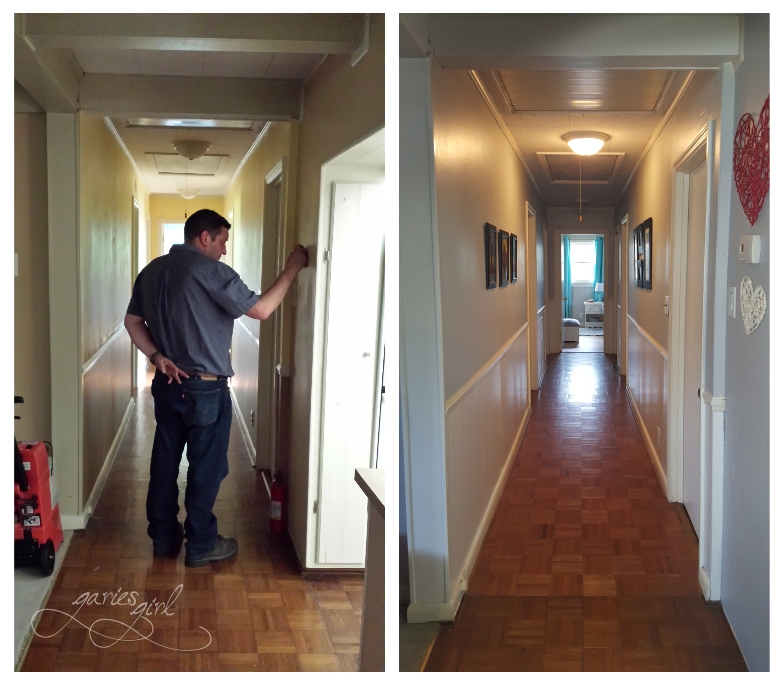
Hallway
This was a quick and easy project – I simply repainted! I’m often surprised by the huge difference a proper color scheme makes. We started out with yellow and brown walls (yuck), and I updated them with my now refined grey and white theme – white below the chair rail, and grey above. I also repainted all the off-white trim, moulding and baseboards. The new color scheme even did wonders for the existing floor. I added some black-and-white artwork, and voila! We now had an updated hallway!
Closet
The hallway closet was another dark and horrible, though very much needed, storage space. It had wood panelling on the walls, unfinished wooden shelves and green carpet. On went some paint and already it looked much better. I used contact paper to cover all the shelves and now felt comfortable storing my extra linens and bedding here. I was also able to fit all my plastic bins with seasonal decorations on the floor of this closet. Since they covered most of the green carpet, I decided to leave that in place (for now).

I love an organized closet. Rolling your towels and comforters make it easy to see what you have and grab what you need. Quick tip for storing linen sets: fold the top sheet, fitted sheet and second pillowcase, and place them inside the remaining pillowcase. You now have only one item to grab when changing bed linens.
Hallway Bathroom
Ugh, I absolutely hated this room when I first saw it. See what I mean?

Green walls, awful patterned counter-top, a yellow sink, and the ugliest vinyl floors ever!
I needed a plan for a quick and cheap refresh. Amazon came to my rescue again with a peel-and-stick vinyl floor tile (in dark grey of course), and another product for countertops – a self-adhesive contact paper. I picked a white-grey marble look for the countertop to go with my new grey floors.
I started this project by removing the glass doors from the tub and replacing them with a shower rod and curtain instead. I repainted the cabinet a darker shade of grey and chose a lighter grey for the walls. The mirror also got a new look with bright white paint for the frame.
Both the countertop and floor installation were easy to do, just a little time-consuming. I did need a second set of hands for the countertop part though. Simon helped me with this and kept the vinyl sheet elevated, while I started smoothing it down from one end.
Originally, I thought the window had a stained glass insert, but realized it was just a sticker (why?!) and removed that very easily. I kept the yellow sink (it was a for now kind of thing) as well as the tub surround. These were going to have to stay until we could do the full remodel.
My new look was completed with black and white artwork, bathroom rugs and new window blinds.

Such a huge difference! I was very pleased with the bathroom update and felt inspired to take on the last bathroom on our project list – the Pool Bathroom.

One thought