I love everything about winter. I love staying indoors, fires in the fireplace, hot drinks and soups, heavy sweaters and cozy blankets. But by March, I’m ready for a change. Here in Georgia the weather can be very interesting in March. Daffodils start blooming and makes you think Spring is on her way, and then surprise cold fronts can push everyone and everything back indoors with below freezing temperatures. And back and forth we go between Spring and Winter, until Spring finally wins towards the end of the month.
Now that it is April and officially Spring, I have a long list of projects we need to do outside. While things are still very scary “out there” with the COVID-19 pandemic, we need some distractions around the house. An easy outside project was just what we needed to ease us back into our project list.

Take a Look at the Mailbox
Does your mailbox look a little dull and in need of a refresh? Is your flowerbed overgrown with weeds or worse, non-existent? Has the post seen better days? Well, here is a project for you.
Replace the mailbox post, the mailbox and update the flowerbed.
Most of your big box hardware stores sells the posts ready to go and this is exactly what we did. We picked up a new post, and while we were there, also grabbed a new mailbox and street number letters. And we got a small bag of concrete mix, so we can make sure our new post stays in the ground and mulch and plants for the flowerbed.
Getting Started
The previous home owners created a raised bed with edging stones. I wasn’t a fan of this look so we removed all the stones and leveled out the flowerbed. Now we can get to the old post and mailbox to start the actual project!
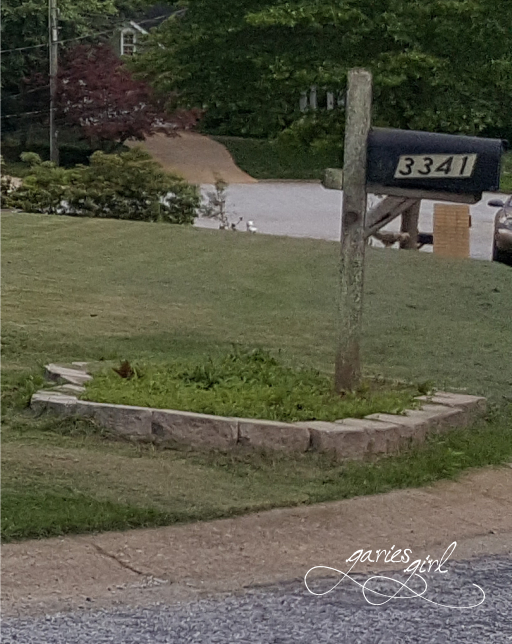
Replace the Post
Dig up your old post (or just pull it out like we did) and prep the hole for your new mailbox post. Fit your new mailbox to the new post and pop it into the hole. We mixed our concrete with some small rocks that we had around the yard. After the new post went in, we filled the area around it with the concrete/stone mixture.
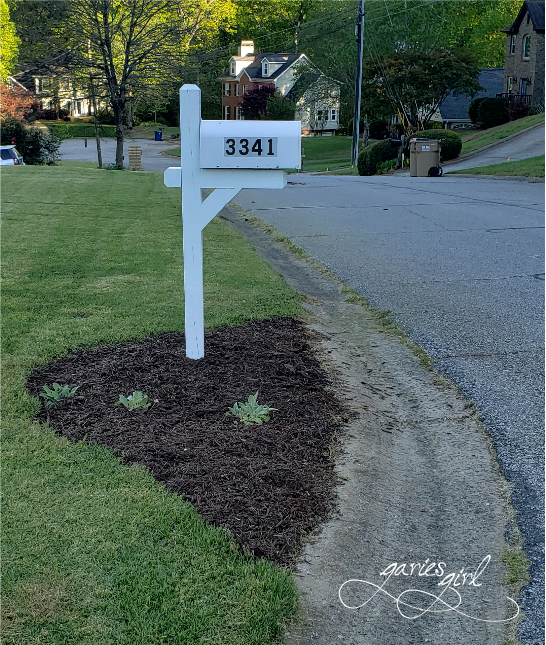
Lastly, add your new street numbers to the mailbox. These are usually reflective stickers and you can peel off the backing and stick them to your mailbox without much effort. Of course, make sure you put them up in the correct order – I almost messed up our address when I applied ours!

Flowerbed
The flowerbed was looking very rough at this point and I needed some color here. Start with your shovel and create a new edge between the lawn and flowerbed first. Remove all the weeds using your preferred weed removal plan, and prepare the soil for new plants.
I made the mistake of planting deer salad, also known as flowers, and these didn’t last very long. You’ll know which plants and flowers will work best in your area. If you don’t know, ask a neighbor or the helpful folks at the nursery (or wherever you buy plants). Wrap up the flowerbed with a nice thick layer of mulch. This will keep the soil from drying out and prevent weeds from growing. And it will make it look pretty!

Add some Paint
The new post was pretty basic and I knew from the start that it will need some paint. Since most of us have some white paint somewhere in the house, this can be an easy project for you to do too. Just get out there with a paintbrush and get it done. Pieter was in the mood for some outside painting and he gave our post a couple of coats of exterior white paint.
Since my first round of plants didn’t last, I transplanted some Lamb’s Ears from another area of the yard. These are “deer proof” and although they don’t give any color in the form of flowers, they provide some greenery in this area.
This whole project can be done in an afternoon and you don’t have to spend a fortune. In fact, we spent less than $90 on this project. Of course, you could buy more expensive posts or mailboxes, or spend more or less money on the flowerbed part.
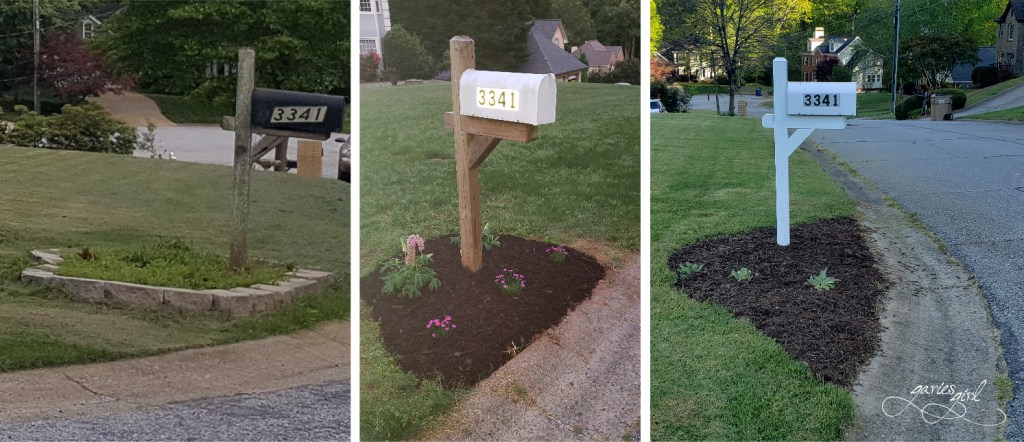
Here’s another look at where we started and where we are at now:
How did you update your mailbox and the area around it?

One thought